September 5, 2023
In this article
Introduction
To top
Introduction
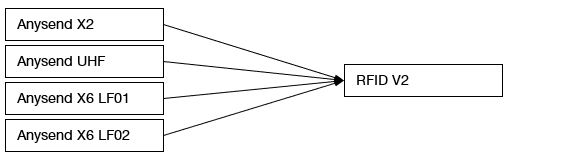
To topRFID V2 (formerly Anysend)
The RFID V2 app replaces the existing Anysend app to handle integration with all our RFID accessories.
You can download the new app here.
Change #1 – Single app for all devices
Instead of different apps and versions for each device/accessory combination we now offer one app that lets you select the module you want to use.
Change #2 – New app ID / package name
The RFID V2 app is a completely new app and because of this you will need to uninstall Anysend before using it. This also means that any settings you had in Anysend will be lost and need to be set again in the RFID V2 app.
Depending on your current integration with Anysend, this will also require some changes to your app:
Option A – No direct integration / keyboard wedge output
If you had no direct integration with Anysend at all and only used the “Paste”, “Keyevent”, or “Clipboard” output mode, you do not have to make any changes to the apps you are using.
RFID V2 will work as a drop-in replacement for your use case.
Option B – Broadcast receiver
If you have a broadcast receiver for Anysend in your app and the output mode set to “broadcast” you will not need to make any changes. Both the broadcast action and extra values will remain the same.
Option C – Controlling state or service
If your app controlled the scan state or service in Anysend, it is likely that you have the “com.handheldgroup.anysend” package name set up on your broadcast or service intents.
This package name must be changed to “com.handheldgroup.rfid” to work with the new RFID V2 app. The rest of the intent continues to be the same.
Change #3 – “module” extra when starting service
Since the new app doesn’t explicitly know which accessory is connected, it needs to be told which module it will connect to. The user can do this by opening the settings and selecting the module from a list.
However, if you start the service from your own app, you can also provide the module as a string extra with the key “module”. The value follows the part-number of the accessory, so current possible values are “NX2-1030”, “NX6EXP-LF01”, “NX6EXP-LF02”, “NX6V2EXP-LF01”, “NX6V2EXP-LF02”, “NX2-EU-1043”, and “NX2-NA-1043”.
If no module value is provided, the app will use the last one it’s connected to.
If you call startService while the service is already running, this value will have no effect!
Change #4 – New Scan Activity
The RFID V2 app provides a new activity that you can call if you want to receive data in your code, but do not want to build your own user interface.
You can start the activity with startActivityForResult and data will be returned in onActivityResult.
This means that this feature is also compatible with the newer Activity Result APIs.
Please see here for a detailed documentation of this feature.
Usage
To top
Usage
To topKeyboard wedge
To you use the RFID app with a existing app that has a input field (e.g. for barcode scanning), you do not need to make any changes to your code.
Make sure to set the Output method to either Paste or Keyboard, enable the Trigger setting and assign one of the hardware keys to F7.
Broadcast
If you just want to receive the tag ID or data in your own code without any additional control, you can use a broadcast receiver.
Make sure to set the Output method to either Broadcast, enable the Trigger setting and assign one of the hardware keys to F7. Register the receiver as shown below:
// Broadcast receiver to barcode data (device == 1) or tag uid (device == 2)
private BroadcastReceiver receiver = new BroadcastReceiver() {
    @Override
    public void onReceive(Context context, Intent intent) {
        if(intent.getAction().equals("com.handheldgroup.anysend.RESULT") == false) return;

        // Numeric representation of the tag type
        int type = intent.getIntExtra("type", -1);

        // String representation of the tag type
        String typeName = intent.getStringExtra("type_name");

        // Data as byte array
        byte[] dataArray = intent.getByteArrayExtra("data");

        // Data as String
        String dataString = intent.getStringExtra("string");
    }
};

// Register the receiver
registerReceiver(receiver, new IntentFilter("com.handheldgroup.anysend.RESULT"));
Start and stop scan
If you want to control the start and stop of a scan from your code instead (or in addition to) a hardware button, you can send broadcasts to the RFID app.
public void enableRfid() {
    Intent intent = new Intent("com.handheldgroup.anysend.SET_STATE");
    intent.setPackage("com.handheldgroup.rfid");
    intent.putExtra("device", true);
    sendBroadcast(intent);
}

public void disableRfid() {
    Intent intent = new Intent("com.handheldgroup.anysend.SET_STATE");
    intent.setPackage("com.handheldgroup.rfid");
    intent.putExtra("device", false);
    sendBroadcast(intent);
}
Scan activity
If you don’t want to build your own user interface for scanning, you can also directly start the scan activity provided by the app.
Setup with MaxGo Staging
When installing the app using MaxGo Staging, you can use a intent command to to apply a configuration. See here for details.
To start the RFID service during setup, create a separate intent command with the “Intent type” set to “Action” and the “Intent value” set to com.handheldgroup.rfid.START_SERVICE.
Scan activity
To top
Scan activity
To topThe RFID V2 app provides a new activity that you can call if you want to receive data in your code, but do not want to build your own user interface.
You can start the activity with startActivityForResult and data will be returned in onActivityResult. This means that this feature is also compatible with the newer Activity Result APIs.
The activity is started with startActivityForResult:
Intent intent = new Intent("com.handheldgroup.rfid.SCAN");
intent.setPackage("com.handheldgroup.rfid");
startActivityForResult(intent, 2522);
If the app has not been configured for a specific module, you will need to provide a string extra with the key module. See below for possible values.
There are other optional string extras that you can provide:
| Key | Description |
| message | A message to show to the user. Default is empty |
| title | Title shown in the window. Default is “RFID Scan” |
| cancel | Text for the cancel button. Default is “Cancel” |
| color | Accent color in “#XXXXXX” format. Default is “#2e99d5” |
After a successful scan, any error, if the user pressed “Cancel”, or when the user pressed the back button, the activity closes
and triggers onActivityResult on the activity that called startActivityForResult.
The resultCode code will be RESULT_CANCELED if the user canceled the scan and RESULT_OK in any other case.
The data parameter contains a boolean extra with the success which indicates a successful scan or and error.
If the scan was successful, the string extra id contains the ID of the tag. Otherwise the string extra error contains the error message that occurred.
@Override
protected void onActivityResult(int requestCode, int resultCode, @Nullable Intent data) {
    super.onActivityResult(requestCode, resultCode, data);
    TextView status = findViewById(R.id.status);
    if (resultCode == Activity.RESULT_OK) {
        boolean success = data.getBooleanExtra("success", false);
        if (success) {
            status.setText("OK - " + data.getStringExtra("id"));
        } else {
            status.setText("Error - " + data.getStringExtra("error"));
        }
    } else {
        status.setText("Canceled by user");
    }
}
Options for module extra
Both the startService and startActivityForResult intent support a module extra with one of
the following values.
- NX2-1030: For the Elatec Module on the Nautiz X2 with Android 6, 7, or 11
- NX2EXP-LF: For the iDTRONIC IDT01 on the Nautiz X2 with Android 6, 7, or 11
- NX2-EU-1043: For the Pistol Grip UHF (EU) on the Nautiz X2 with Android 6, 7, or 11
- NX2-NA-1043: For the Pistol Grip UHF (NA) on the Nautiz X2 with Android 6, 7, or 11
- NX6EXP-LF01: For the Agrident Module on the Nautiz X6v1 with Android 8
- NX6EXP-LF02: For the Elatec Module on the Nautiz X6v1 with Android 8
- NX6V2EXP-LF01: For the Agrident Module on the Nautiz X6v2 with Android 11
- NX6V2EXP-LF02: For the Elatec Module on the Nautiz X6v2 with Android 11